Thursday, February 25, 2016

I Made a Secnd Set of Stations of the Cross


This set was made using a plastic pin.


I bought the pins at Hobby Lobby. They were the perfect size for my 2-inch round punch. So I punched out 15 turquoise  circles.


I printed out some Stations of the Cross pictures from the internet and taped them to the turquoise circles.


I started popping the circles into the plastic pin.


On the back of each picture I used a number sticker. 


To finish off the project I hot glued some thin leather studded ribbon around the pin.


Putting the Stations of the Cross in order.


I have an idea to make one more set of the Stations of the Cross - then I am going to write simple descriptions for 1st, 2nd and 3rd graders and a more detailed description for 4th and 5th graders. 

I have really enjoyed making these! And plan on using them every year during Lent.


Wednesday, February 24, 2016

Tennis Party Favors


I filled some little plastic containers with green and yellow m&m' With a plastic tennis ball hot glued onto the lid.


The tennis balls were actually cupcake picks.


I simply cut off the long pick.


I filled the little containers with yellow, green and white m&m's.


Last week I didn't make party favors for after the match - but this week I was feeling crafty.


Wednesday, February 17, 2016

Handmade Stattions of the Cross


I substitute taught 3rd grade religion class this week. We were take the children into the church to do the Stations of the Cross and teach a little about the Stations of the Cross. I made these little Stations of the Cross to show the children. I have been wanting to make my own Stations of the Cross forever.

These were incredibly simple to make with just a few supplies from the craft store.

Supplies:

Glass mosaic in a round or oval shape

Pictures downloaded from the internet

Pencil

Scissors

Modge Podge

Paint brush

Number stickers

Pearl ribbon 

Glue gun and glue sticks

Directions:

Download some pictures from the internet in the approximate size of your mosaic stone.


I bought these mosaic stones at Michael's. 


These pictures were the perfect size. I used a stone and traced it around each picture with a pencil. Carefully cut out each picture.


Apply a light coat of Modge Podge to the flat side of tile. 


Then lightly press the picture onto the tile. Let dry and apply another thin coat of Modge Podge. Let dry and apply a third thin coat.


Place the correct number sticker on the back of each tile. Apply a light coat of Modge Podge over the number sticker. Let dry and apply another coat over the number.


I bought the pearl ribbon at Hobby Lobby and they have all different colors of pearl ribbon. Heat up the glue gun and apply a thin bead around the mosaic and adhere the pearl ribbon.


Let the pearl ribbon dry. And your Stations of the Cross are ready to use.


I am so inspired! I am thinking of making another set using different photos.

Sunday, February 7, 2016

Fruit Skewers For After the Tennis Match


I made two trays of fruit skewers for after the tennis match on Thursday.


The trays were garnished with a few sprigs of mint.


Quick tip - if you don't have time to cut a pineapple, watermelon and cantaloupe into cubes buy the precut fruit in the produce section. I know it is more expensive but often the convenience is worth it!

Friday, February 5, 2016

Substitute teaching 1st Grade Religion Class This Week


Jesus said come follow me and I will make you fishermen of men Luke 5:1-11.


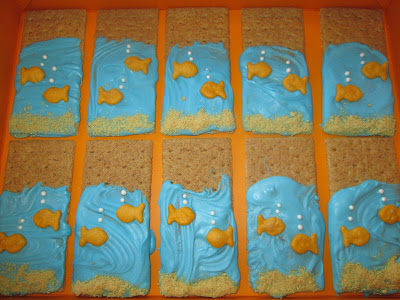
This is first grade so to reiterate the lesson I made the kids these little graham cracker treats. These were super simple to make! I just spread 3/4 of the graham cracker with blue tinted melted white chocolate. While the chocolate was wet I sprinkled some graham cracker crumbs on the bottom of the graham cracker and added the goldfish with little sprinkle balls.


The kids loved the graham cracker treats. I used cinnamon graham crackers which made them so sweet. 


We also learned about St. Blaise because the feast day of St. Blaise was February 3rd.  To reiterate the lesson of St. Blaise I made the kids some candle cookies. We watched a short movie about the life of St. Blaise and since he is the patron Saint of throat disorders Monsignor John came by the classroom and blessed the children's throats. It was adorable.


I simply cut a small marshmallow on the diagonal. Press the sticky portion of the marshmallow into sprinkles and using melted white chocolate adhere the marshmallow to Pirouette cookie. Adding a few white chocolate candle type drippings. They dried on a piece of wax paper.


Once the chocolate is dry they can be packaged into pretzel bags. The kids loved taking home a little reminder treat of St. Blaise.

This week we also started learning a little bit about Lent. Ash Wednesday is next week on February 10th. It is so early this year. 

God Bless all of these darling first graders.

Tuesday, February 2, 2016

Mini Chicken Tarts for After the Tennis Match


I was unsure if we were going to have a tennis match yesterday morning. But we played - it was super windy. I organize the after team lunches for the Captain of the team. I said that I would bring mini chicken tarts. However, it was raining and super windy - so I decided to use my Whole Foods frozen phyllo cups and ran to Trader Joes before the match and bought some chicken salad.


I stock up on these mini shells. They are in the Frozen section at Whole Foods. They are so handy to have in your freezer. 


I picked up three different kinds of chicken salad at Trade Joes.


The curry chicken salad is garnished with rosemary, the wine country chicken salad is garnished with a pecan and the standard chicken salad is garnished with two chives. This took me about 10 minutes to make 36 mini tarts! 

It was super cold and windy during our tennis match! I am subbing for a team on Thursday and have a rain makeup on Friday - I have checked the weather and it should be a lot nicer toward the end of the week!


Monday, February 1, 2016

Valentine Lollipops Made from Candy Canes


I make these Valentine lollipops every year! I buy mini candy canes on sale after Christmas knowing that I am going to make my Valentine lollipops!


Simply preheat your oven to 275 degrees. Line a cookie sheet with a Silpat or parchment paper.  Layout the candy canes into a heart shape.


I baked these candy canes for 5 minutes.  Bake until they are pliable. Depending on the brand of candy canes they might need an extra minute. Once the candy canes come out of the oven - quickly twist a lollipop stick into the bottom of the heart.


Once the lollipops have hardened - they can be packaged into little plastic bags and tied with a ribbon. I found the red lollipop sticks at Hobby Lobby. 

These look really cute presented standing up in a vase! Remember to buy the mini candy canes on sale after Christmas!