Tuesday, November 28, 2017

White Felt Stocking Ornaments


I love sewing little felt projects while I watch television.  These little felt stockings were so simple to make.

Supply List:

white felt

stocking pattern or cookie cutter

pencil

sharp scissors

white embroidery thread

embroidery needle

mini white pom poms

white seed beads

large cotton balls

thin white or silver ribbon

Directions:


Using a blue pencil trace the stocking pattern onto the white felt and carefully cut out the stockings with sharp scissors.


The front of the stocking gets the design. The top of the stocking gets an extra piece of felt.


Sew the front and back felt pieces together with white embroidery thread and stuff with a large cotton ball. Sewing in a ribbon loop at the top for hanging on the tree.


I am planning on tying these ornaments on Christmas packages. Let me know if you make this ornament. Merry Christmas!

Monday, November 20, 2017

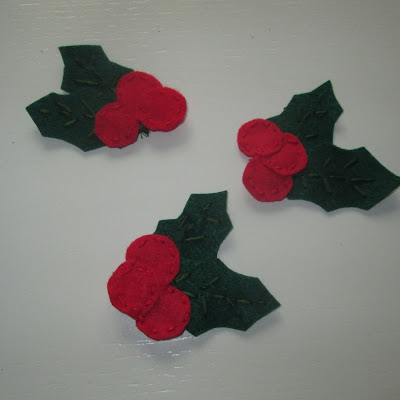
Felt Holly Pins for Meals on Wheels


I think these came out super cute! They would look fantastic on top of a Christmas package. They would make an easy ugly sweater by pinning them all over a sweater.


Supply List:

red felt

green felt

red embroidery thread

green embroidery thread

pin with latch

needle

scissors

template 


Directions:

Cut out the leaves and circles. I used a quarter to trace the the red holly berries. I downloaded a leaf pattern and traced the leaves.  Then I cut out the leaves and holly berries. Each pin needs two leaves  and three holly berries.


Overlap the green leaves and sew them together at the bottom and sew some random veins on the leaves.


Sew the holly berries onto the end of the leaves. Overlap the berries and sew with a running stitch.


The pins with the latches are often found in the jewelry sections of craft stores.


Lightly sew the pin on with green thread.


Have a Holly Jolly Christmas!


Friday, November 17, 2017

Fun Guy Christmas Ornament


A Fungi Story

When I was playing a lot of tennis a few years ago - one of my big toenails became severely  bruised and was hanging on by a thread. It was burning every time I played tennis. I was wrapping the toe with bandaids. So when I went to get my mani/pedi I asked them if they could glue my nail. Because I am so vain - I didn't want to wear sandals with a missing toenail. The lady doing my pedicure said if they glued  the toenail I would get fungi. So she took the nail off.  I wanted to start freaking out! But there was a nail growing under the bruised nail and she painted the new nail and it didn't look that bad.

Supply List:

gray felt

red felt

two sizes of round cookie cutters

black marker

mushroom bead or button

black embroidery thread

white embroidery thread

thin red ribbon

glue gun

glue sticks


Directions:


Cut 2-inch circles with the gray felt. Trace the circles with a round cookie cutter or trace a jar lid or juice glass.


With a black marker write FUN GUY in block letters.


With the black embroidery thread sew over the FUN GUY and sew the mushroom bead in the middle of the circle. I found the mushroom beads in the strung bead section of JoAnne's.


Using a blanket stitch sew the gray circle onto a red or blue felt circle.


On the back of the ornament glue a ribbon loop. Over the ribbon loop glue another piece of gray round felt.


 I hope that everyone knows a Fun Guy! Merry Christmas!

Thursday, November 16, 2017

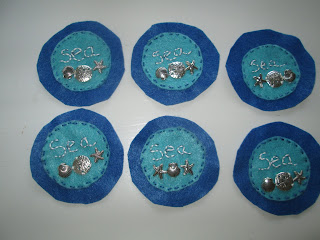
Seashell Christmas Ornament


I started making Christmas ornaments! 


These ornaments were really easy to make. I like to sew them when I watch my favorite television shows.

Supply List:

royal blue felt

turquoise felt

bright green ribbon

white embroidery thread

green embroidery thread

shell beads or buttons

stuffing or cotton balls

scissors

embroidery needle

Directions:

Cut a two-inch piece of turquoise felt. Sew the word sea with white thread. And sew the shell beads below. I found the Seashell beads at Michael's in the strung bead section.


Then sew the turquoise circle onto a 3-inch piece of royal blue felt.


On the back piece of felt - tack the green ribbon onto a royal blue circle.


Sew the back piece and front piece together. Before completely sewing the ornament closed add some cotton balls or stuffing.


Merry Christmas!


Wednesday, November 15, 2017

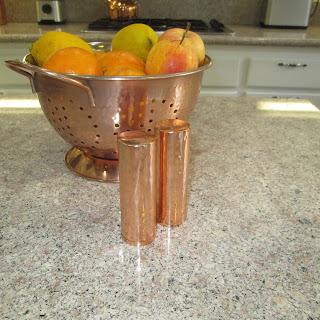
Copper Crush - Adding Copper to the Kitchen


I wanted to have my granite replaced with marble or quartz - but my husband said no. However, I think that the copper looks okay with my current granite. And I am still working on him for our countertop redo.

Here are some before and after photos!


So I started buying a few copper things here and there and I think it freshened up the look of my kitchen.


I am a super neat freak about my kitchen!


Tuesday, November 14, 2017

Preparing to Teach 5th Grade Religion Class


I made these little m&m tubes for a little take home treat. I buy the fall themed m&m's before Halloween.  And I punch a little circle and write "Be Thankful."

If you want to buy these thin cellophane tubes google 1" x 8" cellophane tubes.

Our Gratitude craft is going to be a lot of fun!


The craft is a grateful cross. The mini ziplock bag has fall colored squares that are going to be adhered to the cross. The kids will write thankful items inside of each square. A piece of ribbon is also inside of each ziplock bag - so they can glue a ribbon loop on the back of each cross.


Iced pumpkin cookies for our snack.


One of the worksheets i downloaded.  I have the best class this year - such good kids!

Tuesday, November 7, 2017

Cheese and Cracker Turkeys


I made some cheese and cracker turkeys for my 5th grade religion class.  They are a little take home treat.

I hade everything that I needed to make these cute little treats except the cheese and crackers.

Using a scalloped punch I punched two fall colored pieces of scrapbook paper for the feathers. I taped the feathers to the back of the turkey.

Using a glue gun I adhered the eyes, waddle and beak.  Such a fun and easy craft. It would be a wonderful classroom, sports team or neighbor treat!