Tuesday, December 20, 2016

Wrapped Christmas Gifts


I like to gift wrap packages of my homemade Christmas ornaments. This year I have used the Poinsettia pins as ribbons on the packages. The Poinsettia pin is day 10 of the the twelve days of ornament project.


 I have used a lot of polka dot wrapping paper. Most of this wrapping paper was left over from last year!


I actually wish that I had made more felt poinsettias! I think they make really cute bows.


This gift has a homemade jingle bell ball ornament.  I have wrapped all of my gifts with a little homemade ornament tied onto the ribbon. 

Merry Christmas.


Monday, December 12, 2016

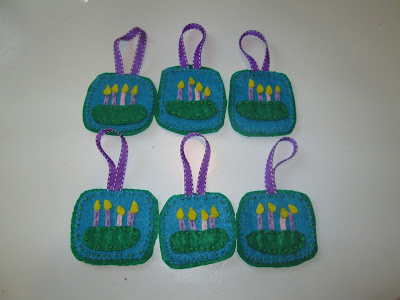
Felt Advent Wreath - Day 12 of the Twelve Days of Ornaments


I was originally going to make an Angel for the last ornament and I even cut out all of the angel components out of felt and changed my mind and made this Advent wreath. I found the pattern and directions on the www.wildolive.blogspot.com  and then I modified the pattern to fit my needs and the felt I had on hand.

Supply List:

Pattern from Wild Olive blog

Black pen

Scissors

Pinking shears

Turquoise felt

Green felt

Purple felt

Pink felt

Yellow felt

Embroidery thread in green, yellow, purple and pink

Purple thin ribbon

Hand sewing needle


Cut out the components to make the ornaments and lay them out in order.


The turquoise felt is cut with pinking shears. On the turquise felt sew the purple candles on with purple thread - leaving room for the pink candle.


Next sew the pink candle and yellow flames with coordinating threads.


Sew the wreath beneath the candles and the sew the turquoise felt onto the green felt - sewing the purple ribbon in at the top.


Wishing you a blessed Advent season.


Sunday, December 11, 2016

Small Jingle Bell Wreaths - Day 11 of the Twelve Days of Ornaments


This is such a super easy craft that your kids could make them with a little help.


Supply List:

Craft wire

Scissors

Jingle bells

Ribbon

Fancy ornament hooks

Directions:

Cut a 12 to 14-inch piece of wire and twist a very loop at one end.


I think I purchased the craft wire at Hobby Lobby.


Start threading the jingle bells onto the wire and end with another loop.


I used gold and silver jingle bells. But they come in red, green, blue etc.


Take both loops and twist them together. Thread the ribbon through the loop and tie with a bow. Then add a fancy ornament hook. I had the ornament hooks in my craft cabinet. I am not sure where I purchased them.


With extra jingle bells I made little balls.


I also found some red and green bells in my craft cabinet and I think they make a festive ornament.


I also made a wreath out of beads and I think it came out super cute.


I think these will look super cute on the tree. Merry Christmas!

Saturday, December 10, 2016

Poinsettia Pin - Day 10 of the Twelve Days of Ornaments


Today I made these super easy Poinsettia pins. They can be pinned onto a stocking, pillow or a gift. The small pins can to pinned onto a sweater..A  few large pins could be used to create an ugly Christmas sweater. If you are planning on attending an ugly sweater party!

Supplies:

Red felt

White felt

Scissors

Red embroidery thread

White embroidery thread

Bar pins

Glue gun

Glue sticks

Rhinestone beads or buttons

Directions:

Cut strips of felt into 3-inch pieces, 2-inch pieces and 1-inch pieces. Then cut each strip into rectangles and squares.


Hand cut each square or rectangle into a leaf or teardrop shape.


Trace circles onto felt with a juice glass for small poinsettias and a large water glass for large poinsettias.


On the back of each circle sew a bar pin using coordinating thread. I was out of white felt so I used a green felt circle for the larger pins.


Turn the circle with the pin facing down and start gluing the larger leaves around the circle.


Then another row of leaves between the firsr row.


Then another row of smaller leaves and finally glue in the a rhinestone.


Notice some poinsettias are small and some are large - these were so much fun to make. I am planning on putting the smaller ones onto gift packages.


If you want to use these for ornaments on the tree simply glue in a ribbon loop.


I also made some white felt flowers but they didn't photograph very well!


Friday, December 9, 2016

Sledding Down the Slopes - A Sled Ornament Day 9 of the Twelve Days of Ornaments


These ornaments are simple and fun to make especially if yu buy the prepainted popsicle sticks.

Supply List:

Painted popscile sticks

Mini craft sticks

Standard color popscicle sticks

Hot glue gun

Glue sticks

Paint

Small paint brush

Twine

Scissors

Holiday stickers (optional)


Directions:

Layout 5 painted poppsicle sticks in a staggered design and glue them together with hot glue. Note: instead of painting the popsicle sticks - they can be purchased in packs of colors already painted. I have also noticed that Pinterest crafters cover the popsicle sticks with Washi tape.


Then hot glue two mini popsicle sticks at the top and bottom of the sled.


Hot glue the sled blades on each side.


Wait for everything to dry before turning the sled over.


Once everything is dry a holiday sticker can be added to the front of the sled and a twine or ribbon loop can be glued onto the underside of the sled.

See you on the slopes! Merry Christmas!

Thursday, December 8, 2016

Back at the Lodge Ski Ornaments - Day 8 of the Twelve Days of Ornaments


I made these ornaments last year also. They are so simple to make and look fantastic on the Christmas tree or tied onto gift packages.


Supply List:

popsicle sticks

paint

paint brush

toothpicks

snaps

thin ribbon

twine

scissors

glue gun

glue sticks

Directions:

Paint the popsicle sticks in a color that matches your Christmas themed colors. You can also buy pre-painted popsicle sticks.

After the paint dries glue two popsicle sticks togather to resemble crossed ski's.


Hot glue a metal snap to the end of each toothpick.


 At the top of the toothpick glue a small ribbon or twine loop.to resemble the ski pole handles.


Glue a toothpick pole to one of the ski's and cross the other ski pole over it and glue into place.


Glue a piece of ribbon or twine to the back of the ornament. 


See you at the Ski Lodge! Merry Christmas!

Wednesday, December 7, 2016

For Unto Us a Child is Born - Day 7 of the Tweleve Days of Ornaments


I ordered a bag of nativity ornament/keychains from the Oriental Trading company.


Each kit came with the keychain, string and beads.


And each kit also came with and instruction sheet.


The first couple took awhile to make - then I got into a groove and was able to finish all 12 keychain/ornaments in a couple of hours. 


For unto us a child was born. Oh come let us adore him.

Tuesday, December 6, 2016

Snowflake Ornaments -Day 6 of the 12 days of Ornaments (for Meals on Wheels)


I made 50 of these little snowflakes for a Meals on Wheels winter themed treat. These were incredibly quick to make compared to the Give Thanks wooden signs - which took forever to make.


I bought two of theses little snowflake kits in January on super duper sale! And I actually remembered to make them this winter for Meals on Wheels.


I actually had a lot of fun making these little snowflakes. I am so glad that I remebered to use these little kits.

Monday, December 5, 2016

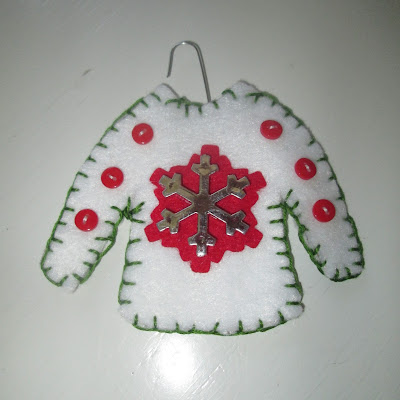
Ugly Sweater Ornaments - Day 5 of the Twelve Days of Ornaments


I love making these Ugly Sweater Ornaments! And you can use up any stickers, rhinestones or beads that you have in your craft cabinet. This is also a fun project for teen girls to make.

Supply List:

Shirt shaped cookie cutter

Red, white and green felt

Black marker

Sharp small scissors

Christmas themed stickers

Christmas colored adhesive rhinestones

Tiny white pom poms

Christmas colored small beads

Ornament hook

Tacky glue

Scotch tape 

Red, white and green embroidery thread 

Needles


Directions:

Using the fine tip black marker trace the shirt cookie cutter. Or make your own cardboard patter,


I usually trace a bunch of sweaters at the same time.


Then I cut out a ton of shirts at the same time.


I sorted through my craft cabinet and found all sorts of stickers, mini beads and buttons, rhinestone stickers etc.


On the front of each sweater place one large sticker.


Try to find colorful stickers with some dimension.


On the back part of the bottom sweater tape or use tacky glue to adhere the ornament hook.


Sew some buttons or beads on the top piece and then sew both pieces together in a contrasting thread with a blanket stitch.


Each sweater should look a little different! Sequins would also look cute sewn on these sweaters.


I was also thinking of sewing little snowflakes on the sweater. But then I decided to use up some of my supplies - making room to buy more craft supplies.


A set of Ugly Sweater ornaments would make a cute hostess gift, They would also look cute tied onto the top of a Christmas gift. Or used as an invitation to an ugly sweater party.

I will NEVER wear an ugly sweater! I can only make them!