Friday, October 28, 2011
Tuesday, October 25, 2011
Candy Corn Cookies

Using the Land o Lakes recipe I made some Sparkling Candy Corn Cookies. This recipe makes 15 dozen miniature cookies and each cookie is approximately 25 calories.
Recipe:
1 cup butter, softened
1 cup sugar
1 egg
2 tablespoons orange juice
2 teaspoons freshly grated orange zest
1/8 teaspoon salt
3 cups all-purpose flour
1/2 teaspoon baking powder
Orange paste or gel food color
Yellow paste or gel food color
3/4 cup sugar
Directions:
Line the bottom and sides of a 9 x 5-inch loaf pan with plastic wrap. Set aside.
Combine butter and 1 cup of sugar in a large bowl; beat at medium speed until creamy. Add egg, orange juice, orange zest and salt. Continue beating until well mixed. Reduce speed to low; add flour and baking soda. Beat until well mixed.
Divide the dough into thirds. Press one-third of white dough evenly onto the bottom of prepared pan.

Add orange gel paste to the next third and mix until it is well blended. Press orange dough evenly over the white dough in the pan.

Take the final third of dough and tint it yellow. Place the yellow dough on top of the orange dough. Wrap the dough in plastic wrap and refrigerate until firm (at least 2 hours or overnight.) I made my dough in the morning after carpool - went to the mall with a girlfriend - came home and made the cookies before afternoon carpool. Yes, I can do all that!

Place 3/4 cup sugar in a shallow bowl. Preheat oven to 375 degrees.

Invert loaf pan to remove dough. Peel off plastic wrap. Cut loaf crosswise into 1/4-inch slices. Use a sharp knife to make the edges even and cut each slice into six wedges.

Place the candy corn cookies 1-inch apart onto an ungreased cookie sheet.

Bake for 7 to 10 minutes or until edges are firm and the bottoms are lightly browned.

Cool the cookies for 1 minute. Immediately place warm cookies in bowl with sugar, roll in sugar to coat.

Cool completely. Store in loosely covered container or package into little bags.

These cookies seem like a complicated ordeal. Although they were really simple and fun to make.
Wednesday, October 19, 2011
Peeps Rice Crispy Treats for Halloween
Today I made some Rice Crispy treats for Halloween with chocolate, sprinkles and Peeps.

I almost always use the store bought Rice Crispy treats. They fit the Peeps perfectly.

While the chocolate is melting - I unwrap the Rice Crispy treats and separate the Peeps. I lay everything out on parchment paper and find my Halloween sprinkles.

Dip the Rice Crispy treats in the melted chocolate and sprinkle with Halloween themed sprinkles and press the Peep on top of the Rice Crispy treat.

Once everything is dry you can package the treats into little bags and tie with ribbon. My mouth was watering while I was making these. Make these for your neighbors, the kids in classroom, your kids sports team or for party favors at your Halloween soiree.
Make them for all your favorite Peeps!
Saturday, October 15, 2011
Candy Corn Garland
Today I made a Candy Corn Garland for my dining room chandelier. I Googled some sites about making Candy Corn Garlands and most of them suggested stringing the Candy Corn much like you would string popcorn at Christmas time. Then I read on the Homestories a2z blog It said that she used a glue gun to adhere the Candy Corn to twine. I have a glue gun! I have two different types of twine! Soooooo I decided to use the glue gun method.

While your glue gun is heating up - pour the Candy Corn in a bowl and separate the candy corn into two categories - the useable Candy Corn and the broken and misshapen Candy Corn into another pile.

Once I started glueing the Candy Corn to the twine - I realized that the backside of the garland was unsightly. Sooooo I had to glue the Candy Corn on the front of the twine and then flip it over and glue another piece of Candy Corn to the backside.

This took me a really long time, I had to take several breaks.

Do you see how the backside of the garland is messy? And I had to add another piece of Candy Corn to the backside.

When I was in the middle of the project I measured the garland - so that I knew how long I needed to make the garland.

Then I tied the top area of the garland with yellow satin ribbon and orange polka dot ribbon.
Thursday, October 13, 2011
Bible/Scripture Verse Treat

This year my son doesn't get out of school in time for me to teach a 4 p.m. class. He gets out of school at 3:25 p.m. and by the time we make it through the carpool lane and drive home it is 4 p.m.
So another Mom has been teaching the 6th Grade Bible class for two years and she is awesome! I did not want to step on her toes so.....instead of the preparing lessons for the class, xeroxing worksheets, planning crafts, setting up the classroom etc. I am just a helper! Our new 6th Grade Bible class is at 5:15 p.m. every other Tuesday. One of the projects that I have always enjoyed is making treats for the children. So that is what I have offered to do.

I saw these cute Bible treats on several internet websites and blogs. The majority of people who made these treats used the Hershey Bliss Bites. But.....and you there was a "but" coming - our Scripture verse that we were using this week was too long for the Bliss Bites so I used the Hershey Miniature Bars.

So crafters - always know that you can go to Plan B. I am already thinking about what type of candy or cookie that I can use to write the Ten Commandments. If you have any ideas for my Ten Commandment project let me know.
The Supply List -
Ruler
Scissors
Black Construction Paper
Scotch Tape
Bag of Hershey Miniatures
Thin Red Ribbon
Scripture Verse
First cut your black construction paper into 2 3/4" x 2 1/4" pieces. Tip: you can buy a piece or two of heavy black scrapbook paper at a craft store for less than a dollar.
Now take two mini candy bars and tape them to the black paper like this:

They are taped to the black paper upside down so that you have a flat area to work with.

Using a small piece of tape - adhere a 2 1/2" piece of red ribbon at the very top and between the two candy bars. I bought a spool of thin red ribbon at Michael's for fifty cents.
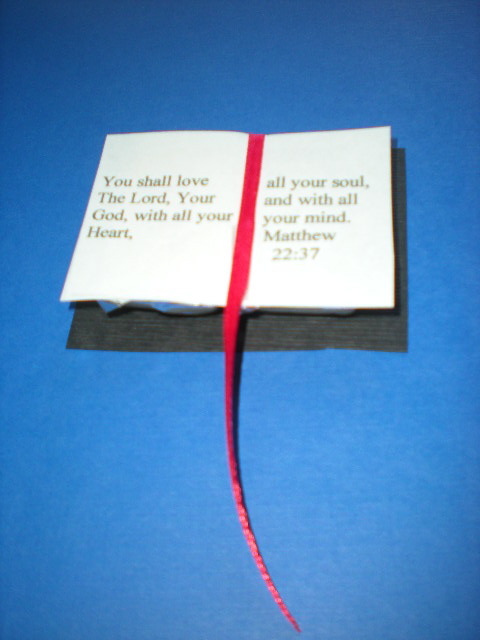
Now I had to experiment with typing the Scripture verse. I started with a 12 point font, then I tried a 10 point and ended up using an 8 point font size. The Scripture needs to fit on a 2 1/4" x 1 3/4" size of paper. Once you find the correct size - cut the verse out and tape it on the candy bars.
This is a simple project that just involves a lot of measuring, cutting and taping. This would also be a wonderful project to make for a First Communion, Baptism or Confirmation.
Tuesday, October 11, 2011
Pink Ribbon Graham Crackers

I made some Pink Ribbon Graham Crackers to pass out to my friends to remind them to make their mammogram appointments. Also in honor of those who have survived and those who are currently fighting.

I spread the Graham Crackers with pink tinted chocolate and sprinkled some with pink sugar crystals and the rest I piped a hot pink Breast Cancer Ribbon.

I had to let the piped on Pink Ribbons dry overnight. Then I packaged them with all different Pink ribbons.

On the backside of the Pink Ribbon Graham Cracker I placed the Sugar Graham Cracker. Yum!

You could also adapt this project for Red Ribbon week. This would be a fun treat to pass out to your neighbors or the Moms on your kids sports teams.
Wednesday, October 5, 2011
Halloween S'more Peep Treats
Today I made some Halloween S'more Peep treats. I know that many of you made these with Easter Peeps.

In a plastic bag you add two Graham Cracker squares, a Hershey bar and a ghost Peep. I recommend the ghost Peep instead of the pumpkin Peep. The ghost Peeps pull apart easier and fit perfectly next to the Hershey bar.

On the back of the Graham Cracker I put a piece of orange paper with the s'more directions.

Isn't this an easy idea? Make these for all your Peeps.

Another tip is to tie your plastic bag with an orange ribbon. I happened to find the orange polka dot ribbon in my ribbon box. Score! At first I tied the bags with black ribbon and it made the s'more kits look a little blah. The orange ribbon really makes the treat POP!

I also used an orange paper to write the directions. I cut the paper with my scallop paper cutter and it was almost the exact size of the Graham Cracker! I just love it when things work out perfectly! Boo!
Sunday, October 2, 2011
Candy Men
Today I made some Candy Men. This is a super easy Halloween treat!
I have been making Candy Men since my daughter (currently 18) was in pre-school. And I have been making them for classroom, sports teams and Religion class treats ever since. All you need is candy and a glue gun.

First try to find some Candy Man heads wrapped in foil - they are by Palmers and I have found them at Target and Ralph's. Then you just need a box type candy for the body. Milk Duds, Nerds, Mike and Ikes all come in mini boxes. For the arms and legs use Smarties, Sixlets, Toostie Rolls.

These Candy Men use a mini box of raisins for the body and Smarties for the legs and Marvels for the arms.

I always use boxes of Junior Mints - because I love Junior Mints and I always eat a box or two while I am making these! If you were making Candy Lady treats for all girls - little boxes of Nerds come in pink and purple!

The above bodies are actually mini boxes of Halloween tattoos. The legs are Halloween colored Sixlets. However, I think the multi-colored Sixlets also look really cute on Candy Men!
Use your imagination in the Halloween Candy aisle! Make sure that you buy enough candy to make your desired number of Candy Men. You can always place the extra candy in your candy bucket that you pass out to the Trick or Treaters.
Subscribe to:
Posts (Atom)